Upgrading My iMac’s Storage
This is a story about how upgrading the storage in my home computer improved my life.
Definitions
Before I continue, I want to quickly define some terms that I’ll be using. Most of you can probably skip over this.
Storage
Storage is where information is kept in computers long term. Types of storage include hard drives, solid state drives, tape drives, compact disks, usb drives, magnetic tape, etc. They tend to be cheap per gigabyte and don’t require power to preserve data (non-volatile). The downside is that they are slower to use than RAM, on-CPU cache, etc.
Hard drive
Hard drives used to be the most popular form of data storage until recently when SSDs have started to replace them. They are usually rectangular and contain a stack of circular platters. Picture a bunch of miniature record players stacked on each other. Each platter has a read/write head that is similar to a head on a record player. To read or write to the disk, the head must move to a location on the disk and then stores bits as magnetic charge. Hard drives are still the cheapest form of data storage (per gigabyte).

SSD
SSD stands for solid state drive. SSD is another form of storage that is starting to become cheaper and more popular than hard drives. Instead of storing information on magnetic platters, information is stored on chips (integrated circuits). Smartphones and most laptop computers these days only have SSDs. They have low access times and high transfer speeds, produce no noise (unlike hard drives which can be noisy), use very little power, are much more durable.

Access time
This is the time required to locate a requested piece of information on a drive. Hard drives tend to have higher access times since a head must physically move over to a location to read data. SSDs have access times that are typically 100 times faster.
Transfer speed
Transfer speed is how quickly a drive can read or write data. SSDs have transfer speeds that are 5-10 higher.
My iMac Story
My computer is a Mid 1011 iMac 27″ that my parents gave me as a gift back in 2012. It’s the ultimate all in one computer. I use it for everything including coding, designing, photo editing, gaming, web browsing and watching movies. I even use it as an external monitor for my work laptop when I am working from home (using target display mode).
Disappointingly, a year and a half ago, it started becoming increasingly sluggish at handling certain tasks. Boot time went up from 1 minute to nearly 10 minutes. Terminal would take 30 seconds to display the command prompt. Finder would frequently slow to a halt and show the Spinning Beach Ball of Death. When playing multiplayer games, I would be the last to load the map. Life became increasingly frustrating. I had a hunch that storage was the problem
When my parents bought this computer, solid state drives were just becoming popular choices for storage, but their cost was prohibitively high. As OWC wrote in their review, “the three other iMac models each have a 1TB 7200-rpm hard drive and options to upgrade to a 2TB hard drive for $150, a 256GB solid-state drive (SSD) for $500, or a combination of a 256GB SSD and either a 1TB 7200-rpm hard drive ($600) or a 2TB 7200-rpm hard drive ($750).”
Back in 2012, even thought I knew that an SSD would make my life better, I couldn’t justify paying $500 or $600 for it at that time. I decided to wait it out and consider the possibility of installing one on my own in the future. Well, that future arrived earlier this year. I picked up a 1TB Samsung EVO 850 solid state drive for $400 and a kit for installing a second drive from OWC for $40.
The Installation Process
I watched OWC’s video a few times in preparation and then set off. The process of adding the SSD took 1 hour and 15 minutes from start to finish. Below is a time lapse video that has been sped up 20 times.
After I finished the installation, I used internet recovery to install Mac OS and migrate my data over from the original hard drive. Apple makes transferring data between drives and computers nearly painless. This whole process wouldn’t have been possible without Apple’s migration tools. Next time you upgrade your Mac, take a look at migration assistant.
The Results
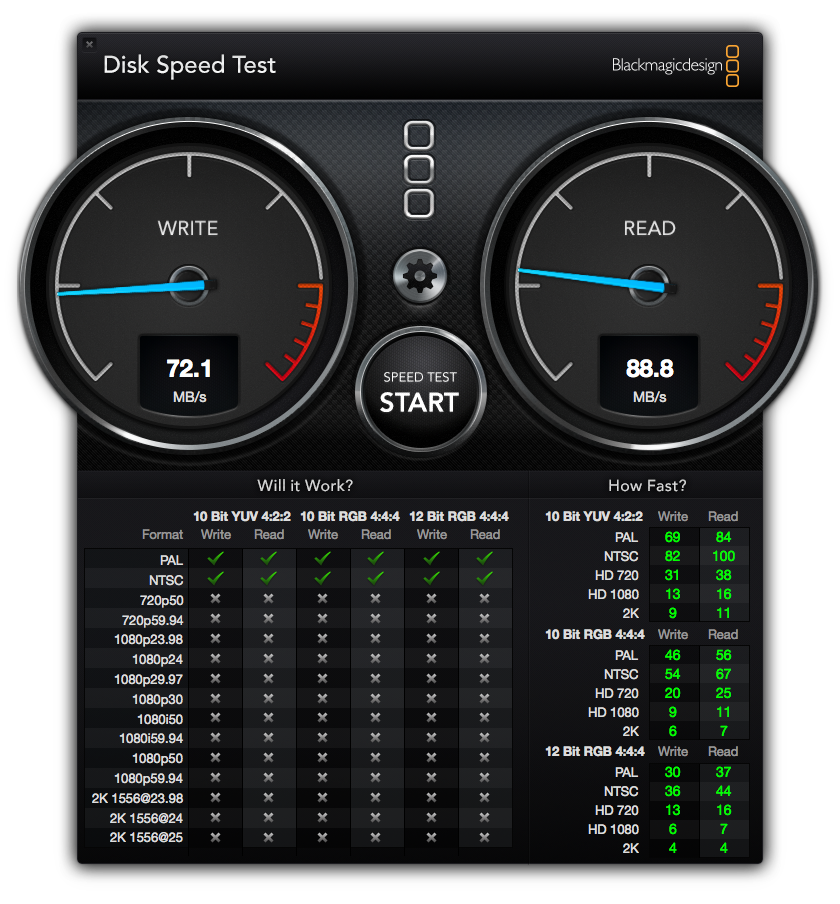
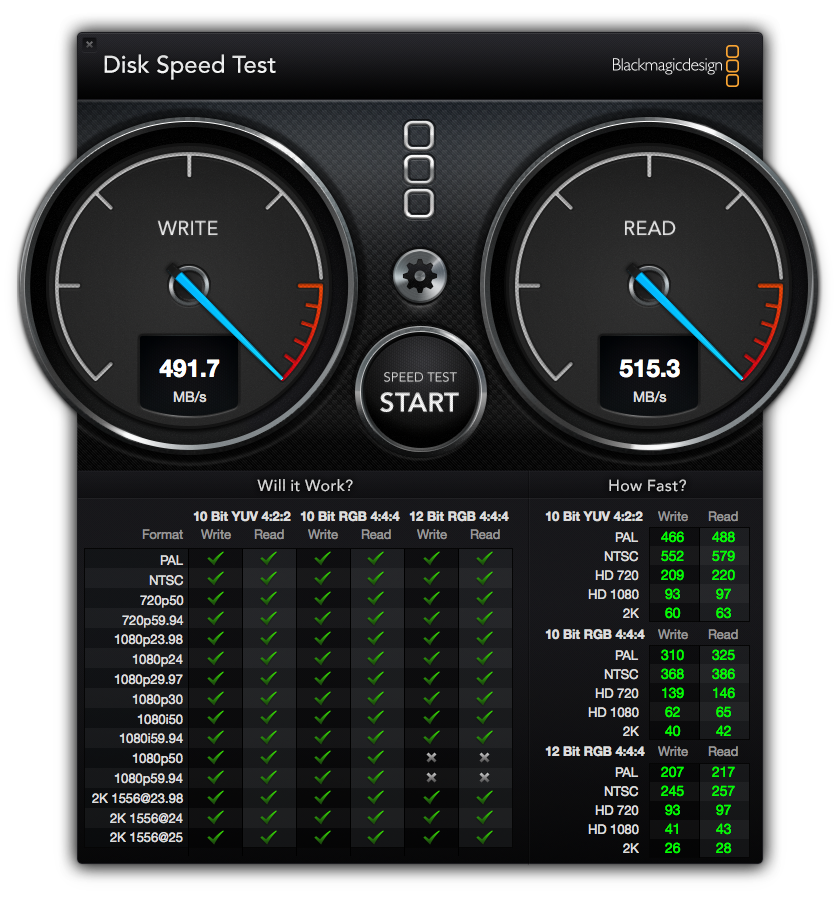
The results are remarkable. Everything feels faster. Take a look at the disk speed test results below. The old hard drive is at the left and the new SSD is at the right. Transfer speeds have increased dramatically. Access time is also much quicker since there isn’t a read head that must physically move.
Below is a side by side comparison of boot times. I actually cut the video short. The hard drive takes about 7 minutes to completely finishing booting and loading my startup items. The SSD on the other hand takes a little under 30 seconds to finish.
Closing Thoughts
Before doing this upgrade, I was starting to lose faith in my iMac. It simply was not very fast anymore, and it was making my life much more difficult. When my livelihood depends on my tools, I think it is reasonable to buy the best tools available.
If you still have a desktop with a traditional hard drive, take a good look at upgrading to an SSD. And while you are at it, replace your keyboard, mouse and monitor. Ergonomic peripherals and good high resolution monitors with good color reproduction are cheap these days and can have a big impact on your productivity.
Technical details:
The old hard drive is a SATA 2 drive and the new SSD uses SATA 3. Fortunately, my iMac supports SATA 3. So, transfers weren’t limited to 300 MB/s as they usually are in SATA 2.
Also, the main thing improving performance is access time. I am rarely reading large amounts of data from disk. So, transfer speed is rarely a problem. The real problem is that when I request data from a hard drive, a read/write head must physically move from sector to header. That is what causes the noticeable delay when opening applications, files, etc.